Whether we’re recording priceless memories, blink-or-miss-it moments or our furriest of friends, smartphones have totally revolutionised the way we capture video.
Whether we’re recording priceless memories, blink-or-miss-it moments or our furriest of friends, smartphones have totally revolutionised the way we capture video.
Never before have people been able to record the world around them so easily and in such high quality, and with the upcoming release of the Samsung Galaxy S9, its fantastic 4K camera, super low light optics and super slow-motion mode, the boundaries are only being pushed further.
But as any videographer or photographer will tell you, a camera is only as good as the person behind it, so if you want to create amazing videos with your swanky Samsung S9, here’s everything you need to know about shooting show-stopping video footage.
Get to know your video settings
First things first, switch your camera to video mode and delve into the settings – there’s loads in there you can use to improve your videos, and although all phones are different, here are some of the most common to get to grips with.
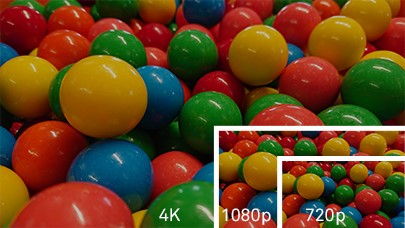
Resolution
Running from 720p, through 1080p, all the way through to 4K video, upping the resolution of your videos will make a massive impact on their quality, turning them from blurry and unprofessional to crisp and beautiful.
High-resolution videos do take up a lot more space than low-res ones, of course. 1080p recordings generally take up around 150 MB of space per minute of filming, while 4K videos (four times as many pixels as 1080p) will take up over 500 MB.
That might seem a lot, but if you want to produce the best possible vids, you should try and record in as high a resolution as possible – invest in a good micro SD card or get a handset with a heap of pre-loaded storage.
It may also be worth investing in either an external hard drive or plenty of cloud storage, allowing you to constantly back up your files and free up valuable disc space.
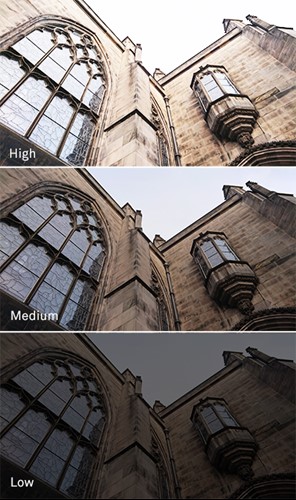
ISO
The ISO number dictates how much light your phone’s camera sensor picks up. Higher numbers equal more light (perfect for recording at night). Just be warned, this may make your videos look grainy - or as the experts say, 'noisy'.
Lower numbers improve the look when there’s plenty of light, such as daytime conditions or under good quality electrical lighting, but are useless when recording at night.
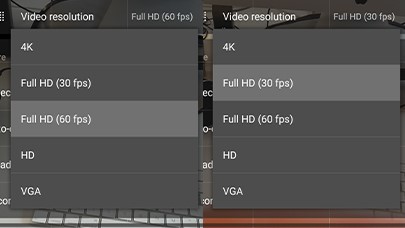
Frame rate
Many phones also allow the user to change how many frames per second (FPS) they record video at.
As a rule of thumb, higher numbers reduce the motion blur of objects moving between frames, leading to more fluid videos. These take up more storage space and may look slightly strange compared to regular, 24/25/30 FPS video – speeds that filmmakers use to give their movies that classic 'cinematic' effect, given that it recreates natural motion blur. For fast-paced action videos, film at 60 FPS or so.
Slow motion video can be enjoyed when you go into the super-high framerates – generally around 120 FPS and above. This is especially handy if you're shooting a busy scene, such as someone jumping into water, or performing a trick on their skateboard.
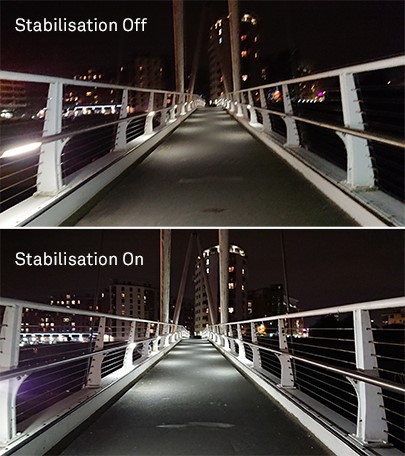
Optical image stabilisation
Most phones come with optical image stabilisation, taking data recorded by the on-board accelerometer and gyroscope and using it to help the optics compensate for, and practically remove, camera shake and other movement from the video.
The other option on the market is electronic image stabilisation. Used on lots of flagships, it does the same job as optical image stabilisation, but crops the image to make it appear as it there’s no blur, resulting in a slight decrease in image quality.
Stabilisation is desirable in most situations, though see what your videos look like with and without to make sure it’s for you.
Compose your shots
Anyone can press ‘record’ and make a video, but it takes thought to capture gorgeous footage that will really grab people's attention. Learn the skills below and say goodbye to amateur shoots for good.
Steady your phone
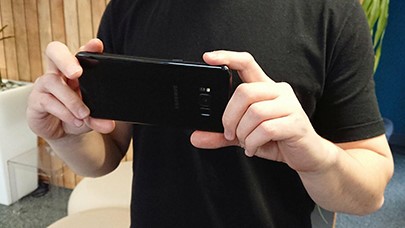
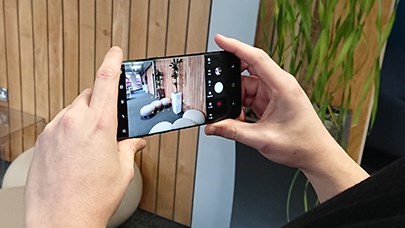
First things first, stabilise your phone by leaning against a solid object or wall, tucking your elbows into your torso, or simply using two hands, and when panning your shot, try to move your body, not your arms.
For the pros out there, there are also stabiliser rigs or gimbals, which, while not cheap, will give you nicely smooth shots.
Shoot horizontally
There are plenty of reasons why most, if not all good video is shot horizontally. Practically every social media platform shows video that way, all televisions display it so, and at the deepest level, it’s how humans see the world, making portrait videos especially jarring.
Understand light
The most important thing to account for when you’re composing any shot is the surrounding light. Get it right, and your subject and background will be bright in just the right places. Do it wrong, and everything will either be too light or dark, and the mood of the video will be totally ruined.
There are two main types of light:
Direct light
Direct light (also known as hard light) gives stark, high-contrast shadows with well-defined edges – think the sun at midday on a cloudless day, or a spotlight on stage – and creates more dramatic shots.
Diffused light
With diffused light (also called soft light), there are very subtle or indistinguishable shadows – think overcast days. This type of light produces softer, less eye-catching shots, but compared to hard light, doesn’t require as much thought when it comes to composition and generally makes faces look better.
When shooting, try and get in between your light source and subject, with the subject lit by the source at an angle to produce a little shadow. Anything can be a source of light: streetlamps, the sun, another phone’s flash angled to the subject, light displays in shop windows. The essence of good lighting is imagination.
Oh, and as a side note, try not to use your phone’s flash – it’s a sure-fire way to make your videos look washed-out, dull and devoid of character. Up the ISO rating in the settings instead.
Faces & eyes
If you’re shooting videos of people, make sure to include their eyes and faces in shot, as there’s nothing more jarring than listening to people speak without being able to see either. Humans are psychologically programmed to assess both, so don’t leave your viewers hanging!
Also watch out for the headroom. Ideally, heads should only have a small amount of space between it and the edge of the shot, unless they’re being shot up close and personal.
Balance
Think of a shot as being divided into two halves. If you want to make your shot ordered or calm, then balance the two halves with objects, people and other points of interest – it can be symmetrical, but it doesn’t have to be. Hunting for a moodier, more unsettling feeling? Unbalance the halves.
Get some depth
Shots look better when there’s a clear foreground, midground and background, each of which come together to help create depth and make a shot simply interesting to look at.
To use depth right, you need to do what the pros call ‘punctuating the frame’. Make your subjects move through the fore, mid and back sections of the frame to impart a feeling of movement and energy, or place them in one area for emphasis – further away to make them look alone or detached, or closer to make them the main event.
Edit your smartphone videos
Make the most out of your shots by editing them in a professional video editing suite, chopping them up, adding effects and touching up the colour.
There’s a vast selection to choose from, but the following are some of the best and most popular pieces of video editing software out there.
If you’re just making quick videos and posting them on Instagram (Android, iOS), the various filters you can apply will do the job just fine. There are loads to choose from, although you probably knew that already…
FilmoraGo
One of the best editing apps for Android, FilmoraGo lets you play around with the video using overlays and filters, adding motion graphics and transitions, and employing pro-level editing tricks such as duplicating, trimming and both speeding and slowing.
Adobe Premiere Rush
Coming from the company most pros regard as the best when it comes to editing anything creative, Adobe Premiere Rush is free to use, letting you expertly polish your shots. Filter, soundtrack, speed-adjust, trim – with this supercharged app you can do it all.
Movie Maker Filmmaker YouTube & Instagram
Another free-to-use app, Movie Maker Filmmaker YouTube & Instagram (Android) lets you edit your videos fully, add effects and more, then share your creations to all the main social media sites. It’s simple and easy to use.
Using the above tips, you should be well on your way to creating amazing smartphone videos, but for the best in smartphone videography, check out the new Samsung S9. With a dual-pixel, dual lens, 12MP camera to record with and the fantastic Infinity Display to help you edit with precision, there really is no better handset out there.